To enable the Doshii configuration, first ensure that Doshii has created your account in their system and supplied you with a Location ID.
Then proceed to complete the steps outlined below.
Note!
Idealpos v8 Build 12 or newer is required for this integration.
If running an older version and/or build, ensure that the POS Terminals and Back Office are upgraded to v8 Build 12 or newer before continuing.
If you haven't connected your system to Idealpos Online, this will need to be completed first before proceeding.
Information on Idealpos Online is available in the Idealpos Online topic.
Note that when Idealpos Online is configured, you will have the opportunity to select the Subscription Type you require, so that you only pay for the functions you require.
The Subscription Types are outlined in the Idealpos Online topic.
Perform the steps outlined within each of the sections below to configure and enable Doshii in Idealpos.
In Idealpos Online, enable the eCommerce Interface.
This can be done as follows:
Login to Idealpos Online, press the settings cog icon displayed on the bottom-left corner of the screen.
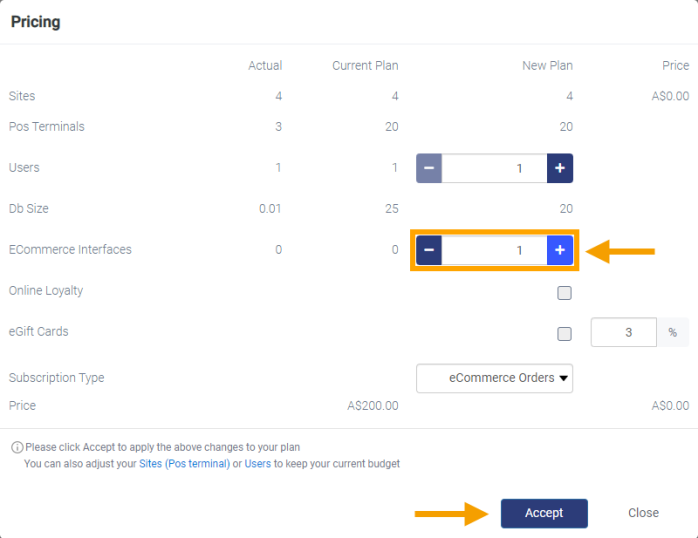
Within the Subscriptions tab, select your Subscription then choose 'Update Plan'.
Set the ECommerce Interfaces to 1 and press 'Accept'.
If you are already using eCommerce, you will need to increment this value by one so that you can add the Doshii Integration in the proceeding steps of the process.
The ECOMMERCE tab will become visible at the top of the page.
Within the ECOMMERCE tab, press the 'Add Service +' button which is shown on the top-right corner of the tab.
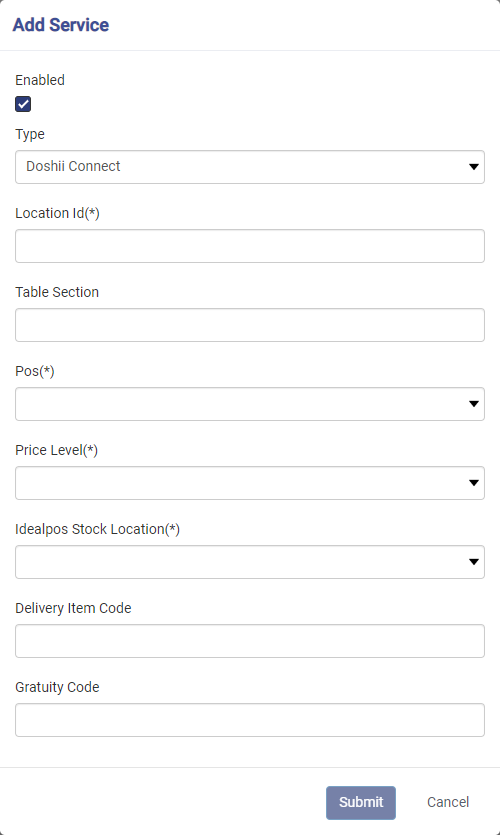
In the Add Service window, select the Doshii Connect option.
Enter the following details:
Location ID: Enter the Location ID as supplied by Doshii.
Table Section: Optional functionality for printing workflows.
POS: Select the main POS Terminal number in your venue.
Price Level: Select the Price Level that will be used for your Stock Items in Doshii. If required, you can adjust the Selling Price Descriptor via Idealpos Back Office > Setup > Global Options > Sales tab > Selling Price Descriptors
Idealpos Stock Location: Select the Stock Location from where you want Doshii to deduct stock from when items are ordered by your customers.
Delivery Item Code: Enter the Stock Item Code for the Delivery Stock Item (this is used for reporting and tracking Delivery charges).
Time Zone: Select the time zone of the venue.
Attach POS Terminals
One Idealpos Online account may be used for multiple Doshii Venues.
Use the Doshii Terminals option to select which POS Terminal will be connected to this venue to stream transactions and receive orders.
After saving, each POS will get a unique Doshii ID.
The Store's Online Hours are used to control what times your Customers can order their items.
When the current time falls within the Online Hours that have been configured, the store will appear as being online and orders can be placed.
If the current time falls outside the Online Hours, the store will appear as being offline and orders cannot be placed.
As Idealpos Online eCommerce only sends trading hours to Doshii and does not receive trading hours configured in Doshii, we recommend that all store trading hours are configured here in Idealpos Online.
The ability to split hours is also possible and can be used in cases where the venue closes for a period of time during the day (e.g. closing the venue during lunch time).
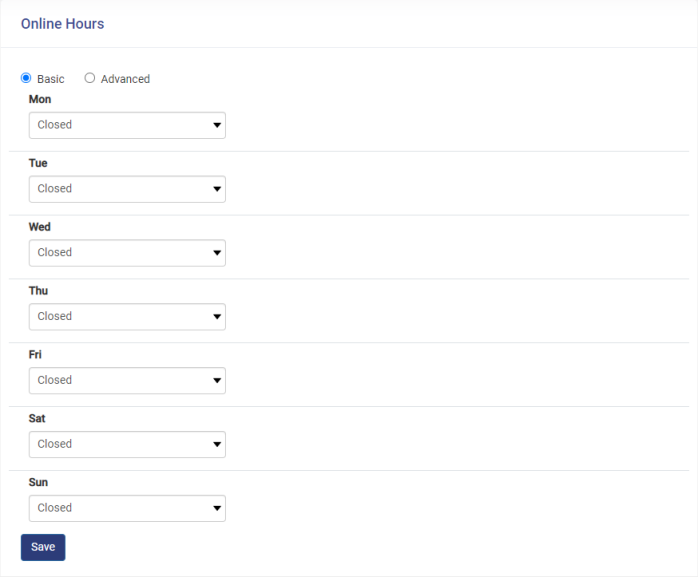
Click on the ONLINE HOURS tab to configure Online Hours.
The Online Hours section is displayed.
Online Hours contain the following options:
Basic - This option allows a single From/To time range to be configured.
Advanced - This option makes the 'Split Hours' checkbox visible; the Split Hours checkbox can then be enabled which will display a second From/To time range so that the store can close between the two From/To time ranges.
Mon to Sun - Set the trading hours for each day of the week. Selecting 'Closed' will hide the From/To trading time fields and will prevent any orders from being placed on days which are marked as Closed.
Selecting 'Open' will display the From/To time fields which can be used to set the times which the venue is open and available for receiving orders.
Unavailable - This section enables a date and time range to be configured when the store is unavailable. This can be used to configure periods of time when the venue is closed, such as during Public Holiday periods.
To add an Unavailable entry, press the 'Add Unavailability +' button.
The following fields will be displayed which can be used to configure the period of time that the store will be unavailable:
Description - Enter a Description that will be used to identify this entry. Typically, this will be the name of the holiday break/period (e.g. Easter, Christmas, etc.).
From - Select the From Date and Time that the venue will be closed.
To - Select the To Date and Time that the venue will be closed.
After the required Unavailability period has been entered, press the 'Save' button. The entry will be listed below.
Go to: Idealpos Back Office > Setup > Global Options > Interfaces > Select 'Doshii' from the list of interfaces shown on the left-hand side.
Upload Menu - Select the POS Screen Menu that will be used for Doshii. A POS Screen Layout may need to be created for this purpose.
Price Level - Select the Price Level that will be used for Doshii.
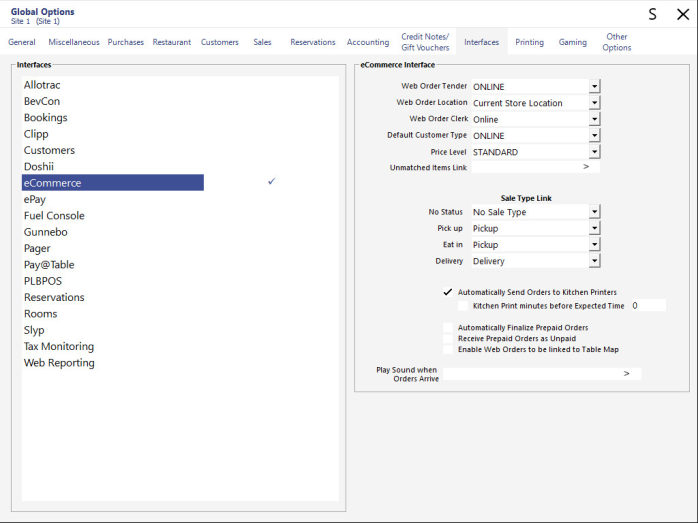
Go to: Idealpos Back Office > Setup > Global Options > Interfaces > Select 'eCommerce' from the list of interfaces shown on the left-hand side.
Configure the options as follows:
Web Order Tender
Web Order Location
Web Order Clerk
Default Customer Type
Price Level
Unmatched Items Link
Sale Type Link
No Status
Pick up
Eat In
Delivery
Automatically Send Orders to Kitchen Printers
Kitchen Print minutes before Expected Time
Automatically Finalise Prepaid Orders
Receive Prepaid Orders as Unpaid
Enable Web Orders to be linked to Table Map
Play Sound when Orders Arrive
Note!
This section is optional.
The user can complete the steps outlined in this section for ultimate customisation, but Idealpos will automatically create options groups in Doshii based on Department for ease of onboarding.
Idealpos supports two different methods of linking Stock Items to Modifier Grids, however, only the second method listed below is supported when using Doshii.
Therefore, any existing Stock Item buttons on your POS Screen that are linked to Modifier Grids [method 1 above] must be changed so that the button simply links to the Stock Item.
Go to: Back Office > Setup > POS Screen > POS Screen Setup > Select POS Screen Layout > Buttons.
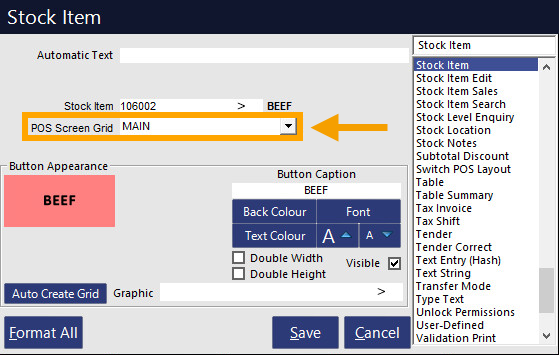
Select Stock Items from POS Screen Grid and ensure that the POS Screen Grid link is set to MAIN.
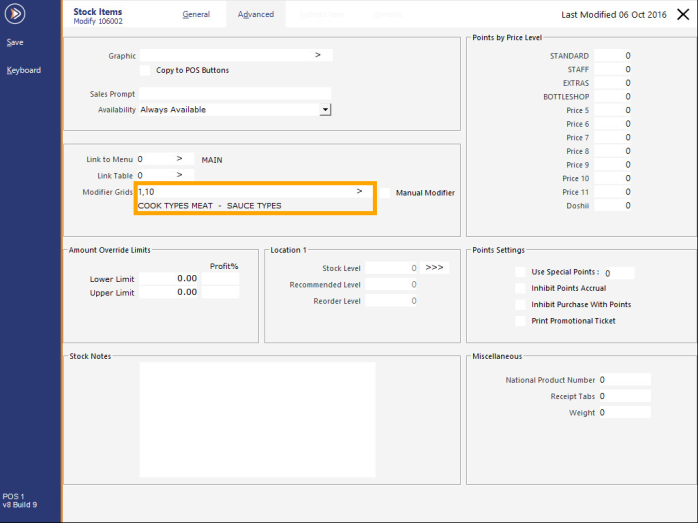
Each Stock Item that requires a Modifier Grid must be linked to the Modifier Grid [via the Stock Item Advanced Tab > Modifier Grid].
Go to: Back Office > File > Stock Control > Select Stock Item > Modify > Advanced tab > Modifier Grids.
Select the Modifier Grids in the order that they should appear.
E.g. Cook Types - Sauce Types.
The selected POS Modifier Grid Codes will be displayed in the Modifier Grids field, with the description and order of each POS Modifier Grid being displayed below the Modifier Grids field.
In this example, the Cook Types will be displayed first, followed by the Sauce Types.
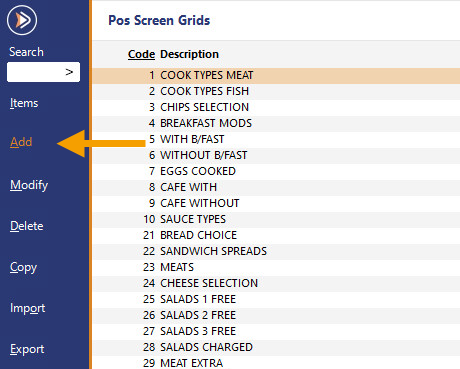
If the Modifier Grids don't already exist, they can be created by going to: Back Office > Setup > POS Screen > Grids, then Stock Items can be linked as outlined above.
Create the Modifier Grids by pressing the 'Add' button.
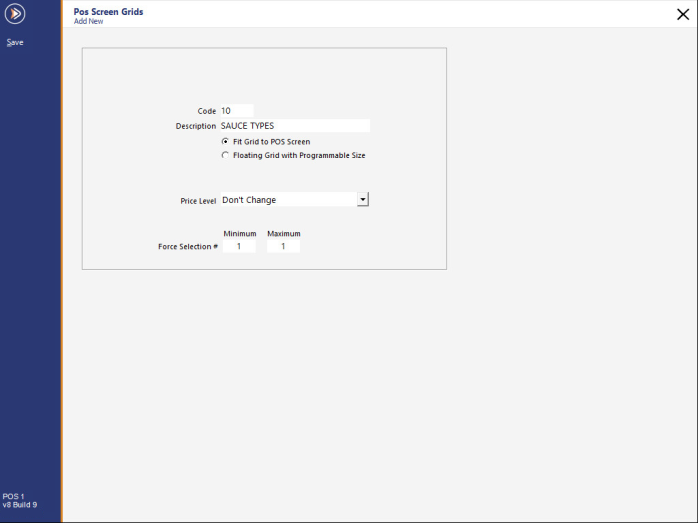
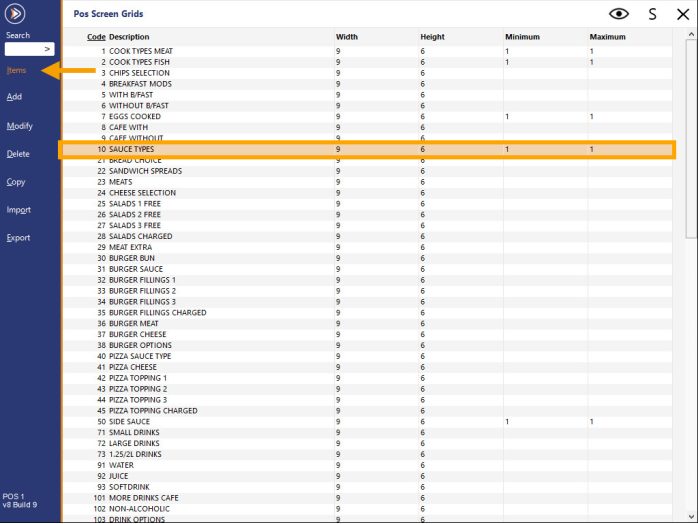
When creating and configuring the Modifier Grids, ensure that the Force Selection Minimum/Force Selection Maximum is configured according to the requirements for that Modifier Grid.
E.g. If configuring a Sauce Types Modifier Grid (containing items such as Gravy, Dianne Sauce, etc.) that will be used for cooked meat , the customer should typically only select one sauce type, so in this case, the Minimum and Maximum fields can both be set to 1.
If configuring a Custom Pizza Ingredients Modifier Grid (containing items such as Salami, Pepperoni, Pineapple, etc.), the customer will require the ability to select more than one ingredient, so in this case, the Minimum field can be set to the bare minimum number of items that the customer will be forced to select, and the Maximum field can be set to the absolute maximum number of ingredients that the customer cannot exceed.
After the POS Screen Grid has been created, select the POS Screen Grid from the list > Items.
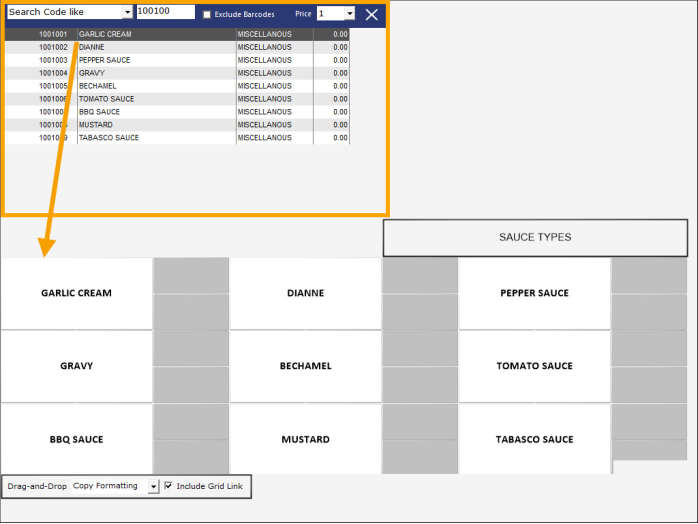
Add the Items/Options to the Modifier Grid and repeat the above process for each POS Screen Grid that needs to be created.
Items can be dragged and dropped from the Item search area on the top-left corner.
Images will need to be added to Stock Items.
Images that are added will be uploaded to Doshii so that when those items are ordered by the customer, the customer will see a visual representation of the item they're ordering.
To add images to Stock Items, go to: Back Office > File > Stock Control > Stock Items.
Select a Stock Item > Modify.
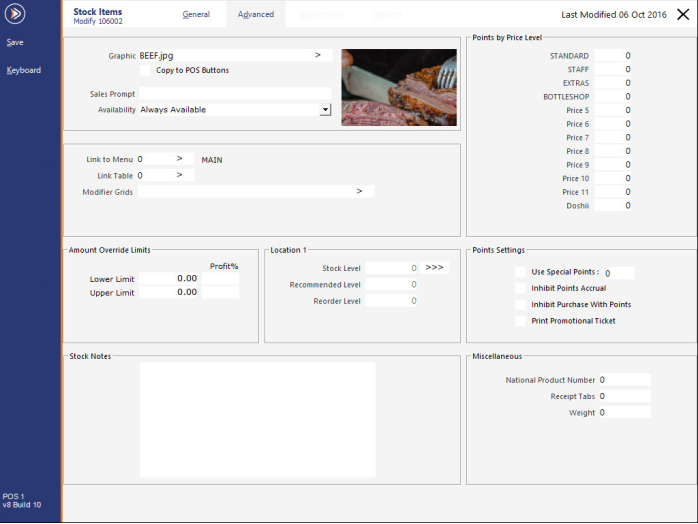
Within the Stock Item Advanced tab, select the ">" button in the Graphic field and browse to location of the graphic of the Stock Item.
The graphic can be located in any folder - Idealpos will automatically copy any graphic that is selected into the Idealpos Pictures folder where all the other Stock Item POS Screen button images are located (C:\ProgramData\Idealpos Solutions\Idealpos\Pictures).
When copying the image to the button, it is recommended that the graphic resolution be of a smaller resolution so that it is suitable for the POS Screen button. Using a lower resolution image reduces the amount of rendering/processing time required by the POS Terminal to display the image on the POS Screen button.
Repeat the process for each Stock Item that will be available for ordering via Doshii.
Note that an option 'Copy to POS Buttons' exists which will copy the image to the Stock Item's buttons on the POS Screen.
After the images have been added to the required Stock Items, we recommend Sending the Pictures Folder to each POS Terminal to ensure that the images are available across all the POS Terminals in the venue.
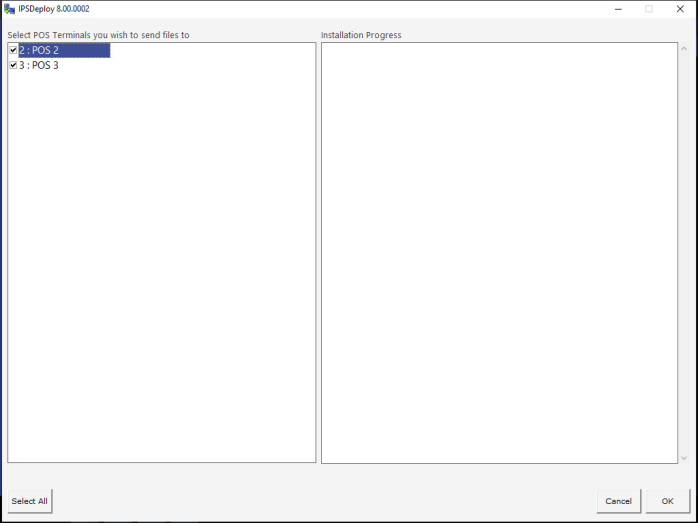
To send the pictures folder, go to: Back Office > Utilities > Send > Pictures Folder.
Enable the checkboxes for the POS Terminals that require their Pictures Folder updated, then press the 'OK' button on the bottom-right corner of the IPSDeploy window.
A new Promotion Group will need to be created for Doshii.
All Promotions that are to be sent to Doshii will need to be created within this Promotion Group.
Note that Doshii does not support the entire set of Discount/Promotion Types that are available in Idealpos, and therefore, any Promotions that are created in the Doshii Promotion Group will only display the Discount/Promotion Types that are supported by Doshii.
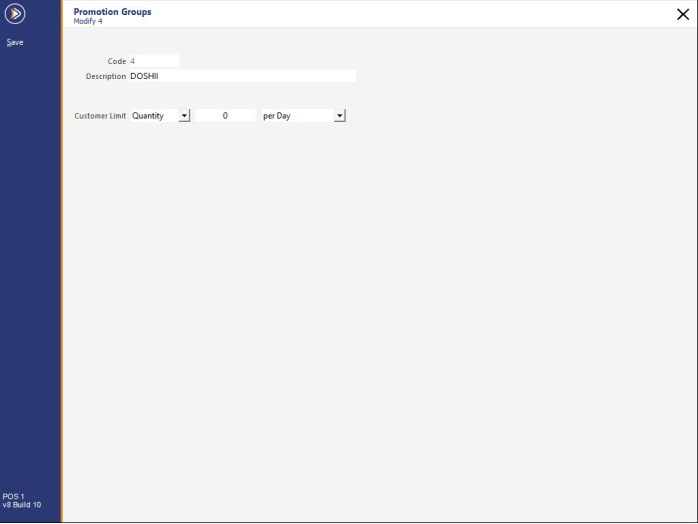
Go to: Back Office > File > Sales > Promotions > Promotion Groups > Add
When creating this Promotion Group, the Promotion Group's Description MUST be set to 'DOSHII'. Renaming this Promotion Group or using a name other than 'DOSHII' will result in unexpected behaviour.
Description: DOSHII
Customer Limit: Leave as default [Quantity 0 per Day]
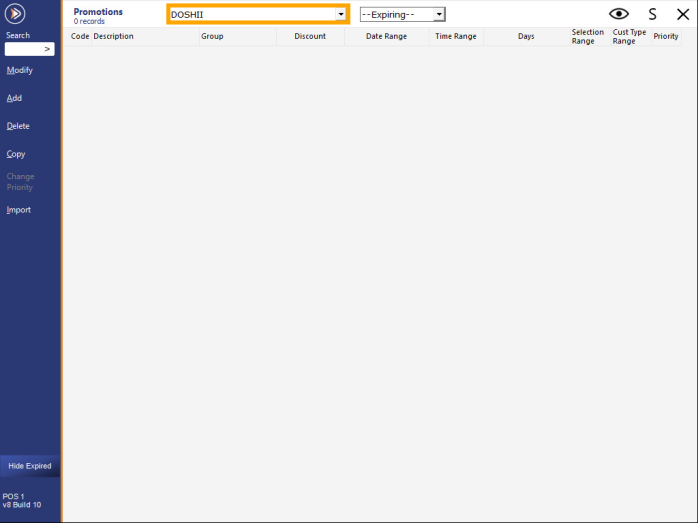
Go to: Back Office > File > Sales > Promotions > Promotions.
When creating Promotions for DOSHII, we recommend filtering the Promotions screen by the DOSHII Promotion Group to assist with the process of distinguishing the Promotions that are specific to DOSHII.
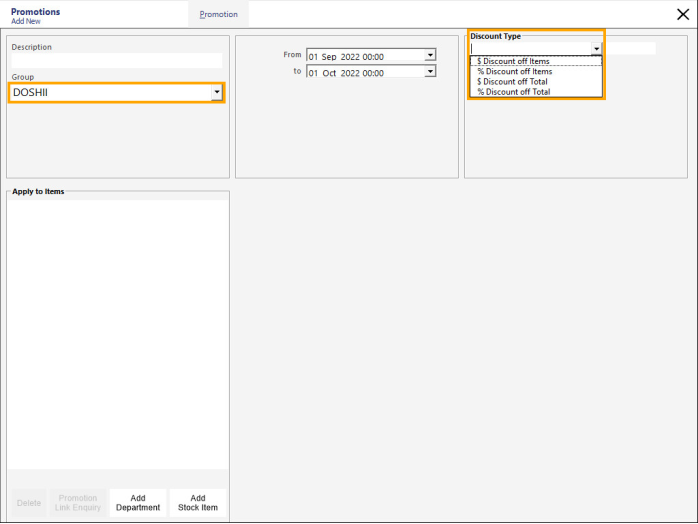
Press 'Add' to create a new Promotion, then ensure that the Group is set to 'DOSHII'.
The Discount Type dropdown box will contain a cut-down list of Discount Types (compared to the Discount Types that are available in the non-DOSHII Promotion Groups).
Discount Types supported by Doshii include:
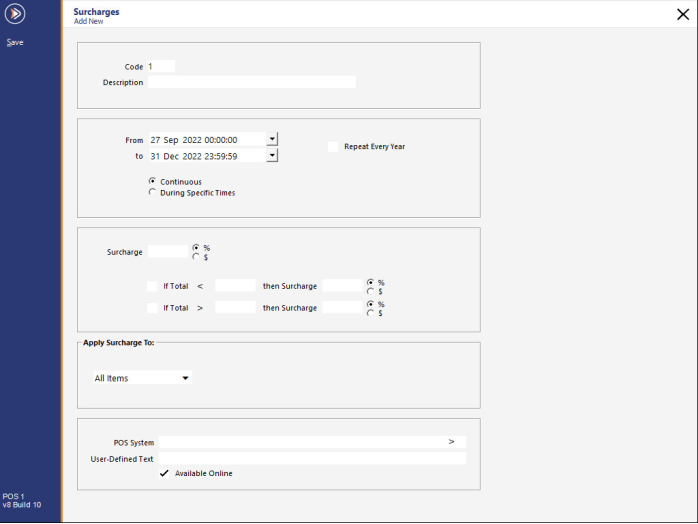
Go to: Back Office > File > Sales > Surcharges > Add/Modify
Add/Modify the surcharges as required for Public Holidays.
Further details about the Surcharge function can be found within the Surcharges topic.
Web Orders configuration consists of toggling the following options so that orders which are received are handled as per the requirements of the venue or store.
Note that most of these options have already been configured in Global Options > Interfaces > eCommerce as part of the steps outlined above.
Also note that any changes to these settings will be reflected in both the Global Options and the Web Store Settings (configured via the Web Store screen on the POS Terminal).
The exception to this is the 'Automatically Accept Orders' option, which can only be toggled on/off via the Web Orders screen on the POS Terminal.
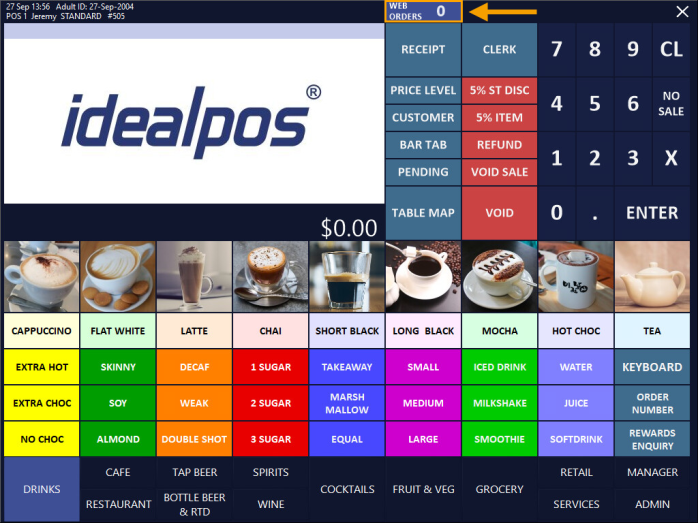
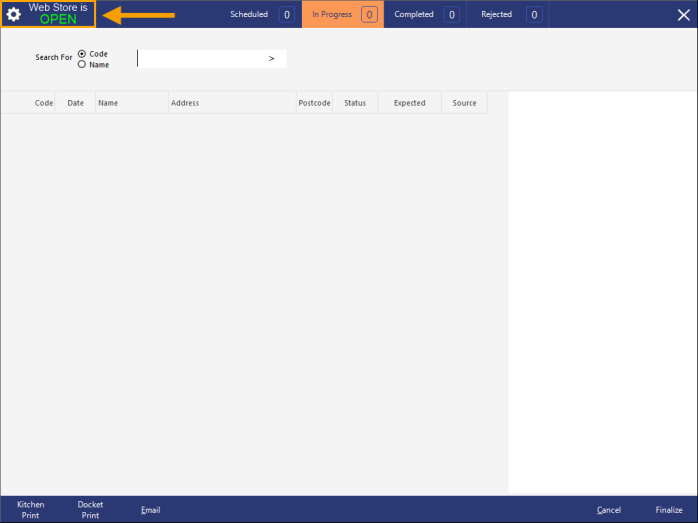
To configure the Automatically Accept Orders setting, go to: POS Screen > Web Orders button [displayed at the top-centre of the POS Screen]
From the top-left corner, press the 'Web Store is OPEN/CLOSED' button.
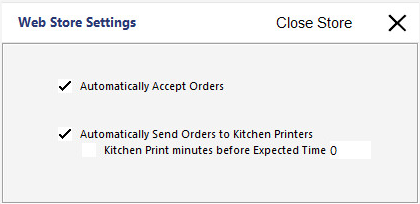
Enter the password
Automatically Accept Orders - Toggle this option as required. When enabled, any orders received will be automatically accepted. When disabled, orders will need to be manually accepted. Note that when accepting orders manually, you will only have a window period of two minutes from the time an order is received to accept it. Failing to accept an order within the two minute window will result in the order being moved to the list of rejected orders.
Automatically Send Orders to Kitchen Printers - This is the same setting as configured in Global Options > Interfaces > eCommerce. Toggling the setting here will also toggle the setting in Global Options.
Kitchen Print minutes before Expected Time - This is the same setting as configured in Global Options > Interfaces > eCommerce. Toggling the setting here will also toggle the setting in Global Options.